

How To Add A New Network On Windows 10
A simpler way of networking, a Homegroup in Windows 10 lets every Windows PC in the business firm share the things most everybody wants to share: music, photos, movies, and the household printer. Set up a Homegroup, and Windows automatically begins sharing those items. The Homegroup strategically leaves out the folder y'all probably don ' t desire to share: your Documents folder.
Homegroups work with any Windows 7, 8, and eight.one computers on your network, equally well. (Homegroups don ' t work with Windows Vista or Windows XP, unfortunately.)
Depending on your network, you may be invited to join a Homegroup every bit soon equally your figurer connects with your router. If so, jump to Step 2.
Here's how to set up a new Homegroup on your Windows PC as well as how to let Windows join a Homegroup you may have already prepare with your other networked computers:
-
Correct-click the First button and choose Control Panel from the pop-upwardly menu.
-
When the Control Panel appears, click the Network and Cyberspace icon. When the Network and Net page appears, click HomeGroup from the right pane.

Can't find the Homegroup setting? Then type homegroup into the Settings' window'due south Search box, located in the window's upper-right corner. When the word HomeGroup appears in the Search Results, click it to open the Homegroup window.
-
In the Homegroup window, click the Change Network Location link, and click the Yeah button in the pane that appears on the right.
When you start connect to a wireless network, Windows assumes it'south a public network, perchance at a coffee store. Naturally, Windows as well assumes y'all don't want anybody to snoop through your estimator, so it leaves your PC "undiscoverable." That means nobody tin can find it on the network, and, you won't be able to find anybody else's computer.
Choosing Yeah, shown here, tells Windows that you lot're on a private network where y'all desire to share things like files and printers.
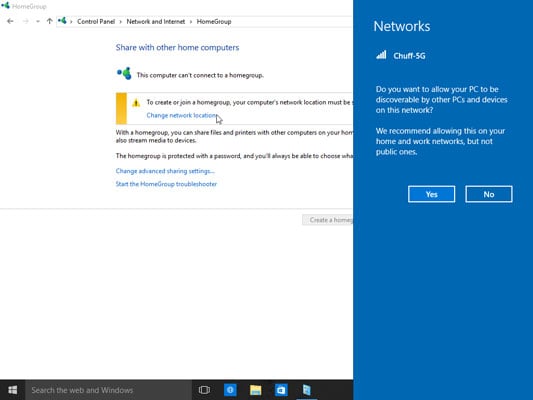
Click Yes to make your wireless network private and allow sharing.
-
Click either the Create a Homegroup or Join Now button.
If you come across a Create a Homegroup push, click information technology to create a new Homegroup.
If y'all see a Join Now push button (equally shown here), somebody has already created a Homegroup on your network. To join it, click the Join At present button.
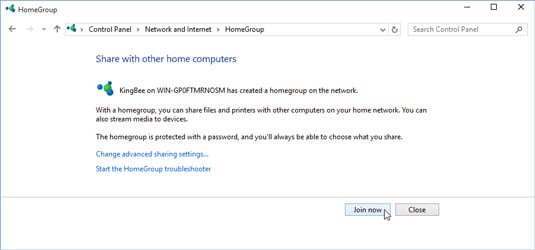
Click Join At present to join an existing Homegroup. Click Create to create a new Homegroup.
Whether you click the Join Now or Create a Homegroup button, Windows asks what items you'd like to share.
If you're asked to alter the network privacy settings on your computer, be certain to choose Private rather than Public.
-
Cull the items you'd similar to share, click Next, and, if joining an existing Homegroup, blazon in your network'due south Homegroup countersign.
Shown in the following figure, the window lets you select the folders y'all want to share with your Homegroup family. To share an particular, choose Share from its adjacent drop-down menu. To keep items individual, cull Not Shared.
Most people desire to share their Music, Pictures, Videos folders, as well as their printer and media devices. Because the Documents folder contains more private material, it's unremarkably left unshared.
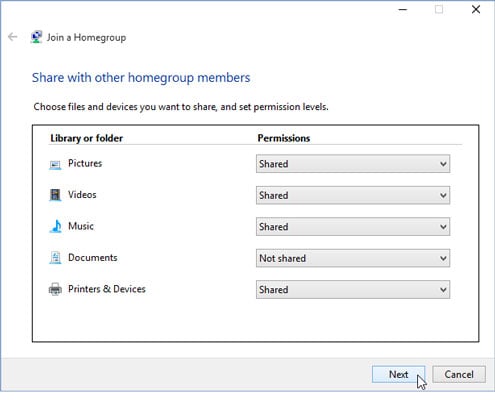
Most people share merely their Music, Pictures, and Videos folders, also as their printers and media devices.
Sharing a folder simply lets other people access that binder's files to view the pictures or lookout man a video, for case. They can neither modify nor delete those files, nor can they create or place whatsoever files in your folder.
Finally, if y'all're joining an existing Homegroup, blazon in the Homegroup's existing password. Don't know the password? On a Windows 7, viii, or 8.one reckoner, observe the countersign by opening whatsoever folder, right-clicking the give-and-take HomeGroup in the binder's left pane, and choosing View the Homegroup Password. (The password is case sensitive, and so make sure you capitalize the correct letters.)
If y'all're joining an existing Homegroup, you're finished.
-
If you clicked the Create a Homegroup button, have note of the password listed at the closing screen.
You must enter that same password into each computer you want to include in your Homegroup. Leave your computer turned on and follow these steps on your other computers to bring together the Homegroup you lot've just created.
When you're through with these steps, you've created or joined a Homegroup that's accessible from every Windows 8.1, viii, and 7 PC on your network. You've also set up your PC to allow its Music, Photos, and Videos folders to exist shared, something I describe in the adjacent section.
Hailing strictly from the world of Windows, Homegroups won't permit you to share items with iPads, or smartphones. For sharing files between those devices, download their OneDrive app.
-
When you create or join a Homegroup, you're choosing which folders to share just from your own account. If other business relationship holders on that PC also want to share their folders, they should practise this while logged on with their business relationship: Open up any folder, correct-click Homegroup in the Navigation Pane, and choose Modify HomeGroup Settings. At that place they can add bank check marks to the items they desire to share and so click Save Changes.
-
Changed your mind about your Homegroup settings? Follow the preceding steps to change which items you'd like to share.
-
After choosing to join a Homegroup, you may need to expect a few minutes until yous're able to share files or printers with your networked computers.
-
Forgot the earth-shaking Homegroup password? Open whatsoever binder, correct-click the discussion Homegroup in the Navigation Pane, and then choose View the HomeGroup Countersign.
About This Article
This article can be found in the category:
- Windows ten ,
Source: https://www.dummies.com/article/technology/computers/operating-systems/windows/windows-10/how-to-set-up-a-homegroup-network-in-windows-10-142182/
Posted by: robinsondointow.blogspot.com
0 Response to "How To Add A New Network On Windows 10"
Post a Comment